Before you start: three questions
An unpopular opening: opening an exchange account is the easiest part of this entire undertaking, and the part that least deserves to be rushed. What determines whether you're glad or sorry in six months is the answer to the three questions below.
1. Are you permitted to do this where you live?
Crypto regulation varies enormously between countries and changes quickly. Some jurisdictions have a fully legal licensed framework; some permit individuals to hold but bar local firms from offering trading; some explicitly prohibit residents from using offshore platforms; and some have no explicit rule, but banks scrutinise crypto-related transfers heavily.
An exchange's signup page will not make this judgement for you. It applies some restrictions based on your network location and the nationality on your documents, but passing signup does not mean you are compliant where you live. Confirming that you're permitted to use a service is your responsibility. This isn't boilerplate — it bears directly on whether you can convert back to your local currency later.
2. If this money went to zero, would your life change?
Crypto has no daily price limits and double-digit daily moves are ordinary. If the money you're considering is rent, tuition, a medical buffer, or borrowed, the correct response isn't “be careful” — it's don't start.
A usable self-test: multiply the amount you're considering by zero, look at the result, and ask whether you'd sleep. If not, halve the amount and ask again, until the answer is “unpleasant, but life continues”. That number is your starting point.
3. What are you actually trying to do?
“Buy some and hold it” and “trade intraday” are entirely different activities requiring different knowledge, time and temperament. For the first, this article is roughly sufficient. For the second you also need the liquidation mechanics (see how liquidation cascades amplify moves) and you need to accept one thing: the more often you trade, the faster round-trip fees pile up, and that cost alone is enough to grind capital down.
One more thing worth saying up front: understanding why prices move and being able to profit from it are not connected by any necessary link. This site teaches explanatory power, not predictive power; the difference is spelled out in why “sentiment improved” explains nothing.
If that's all settled, let's begin.
The six steps below follow the real order of operations. Each has three parts: what to do, why it matters, and where it goes wrong. You can read only the first part — but come back to the third when you get stuck.
Step 1: create the account
What to do
-
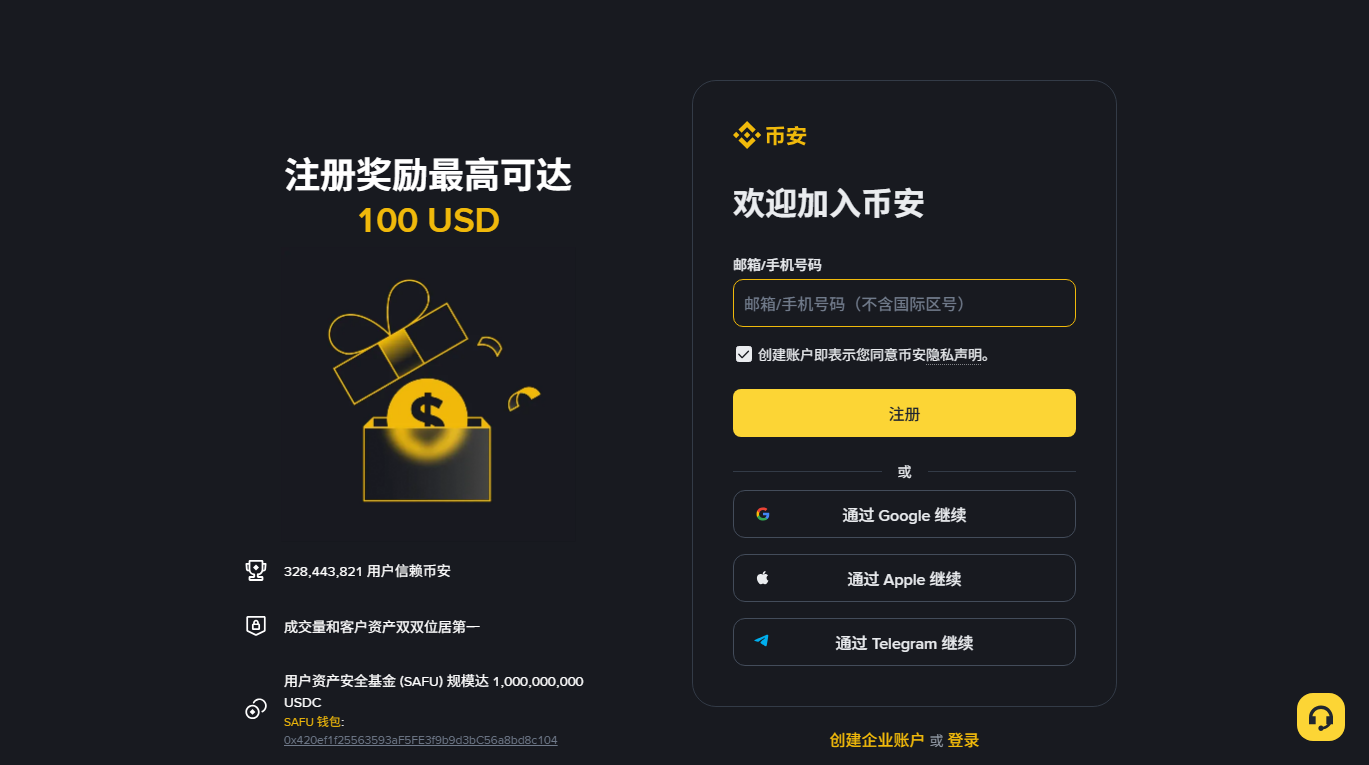
Open the official signup page and check the domain
The signup domain is
accounts.binance.comand the main site iswww.binance.com. Any similar-looking domain is a phishing site. Don't arrive via a search engine's paid slot, and don't click shortened links sent by strangers. Once you've confirmed it, bookmark it and only ever enter from the bookmark. -
Sign up with an email or phone number
The form only needs one of them. Use an address dedicated to crypto services — not shared with your social or shopping accounts, and not a work address, which you lose when you leave the job.
-
Set a password used nowhere else
It must be unique to this account. The least effortful approach is to have a password manager generate twenty-plus random characters and store it. You don't need to remember it; you only need to remember the manager's master password.
-
Enter a referral code (optional)
If you arrived through a referral link the code is usually filled in automatically. Not having one doesn't affect account opening at all: what it mainly decides is whose referral relationship the account is counted under (this page's closing note explains ours). It does not raise the fee rate you pay, and some referral codes also carry a partial trading-fee discount whose size is set by the exchange's rules — go by what the sign-up page shows at the time. The referral relationship generally cannot be added after signup, so if you're going to use one, this is the step.
-
Complete email or SMS verification
Enter the code and the account exists. You can log in, but you can't do much yet — deposits and trading require identity verification first.
Why it matters
Only two things in this step really count: verifying the domain and password independence.
Phishing sites can be pixel-identical to the real thing, and the domain is the only reliable tell. So make “enter only from my bookmark” a habit: if you never open the login page from search results, chat messages or ad slots, a fake site never gets the chance to appear in front of you.
Password independence defends against a different attack: credential stuffing. After some unrelated small site leaks its database, attackers take the email and password pairs and try them at every exchange. If your exchange password matches the one from that small site, your account opens in that first pass.
Where it goes wrong
- The code never arrives. Check spam first; for phone signup, check whether your carrier's filtering blocked it. Switching method (email ↔ phone) usually works around it.
- “Not available in your region”. That's a restriction based on your network location. Don't route around it — accounts created that way are very likely to be frozen at verification or withdrawal, and recovering funds at that point is painful.
- Whether to use third-party signup. Google or Apple signup is quick, but it ties your exchange account's security to that account. Unless the underlying account already has hardware-grade two-factor, prefer a dedicated email address and an independent password.
Step 2: finish the security setup before anything else
Order matters here. Complete the security configuration before you put a single unit of currency in. The reason is simple: with an empty account you have unlimited time to configure, test and make mistakes. Once there's money in it, any configuration error can cost everything.
What to do
-
Turn on two-factor authentication, preferring an authenticator app
Bind a TOTP authenticator (Google Authenticator, Authy, the one built into 1Password). Don't rely on SMS alone. SMS can be taken through SIM-swap attacks — an attacker socially engineers the carrier into reissuing your number, your phone abruptly loses signal, and the codes start arriving at their device.
During setup you'll be shown a backup key of a dozen or so characters. Write it on paper and store it properly; don't only screenshot it to your phone. If the phone is lost or wiped, that key is your only route back.
-
Set an anti-phishing code
This is a short string you define. Once set, every official email from the platform carries it. Any “Binance email” without it is forged. Two minutes of setup for the cheapest phishing filter available.
-
Enable the withdrawal allowlist
With it on, assets can only be sent to addresses you added and verified in advance, and newly added addresses usually face a cooling-off period. Which means that even if an attacker takes complete control of your account, they can't move funds immediately — and you have time to notice and freeze it.
-
Review devices and third-party authorisations
Security settings show logged-in devices and authorised applications. Remove anything you don't recognise and every old phone you no longer use. Come back and glance at this periodically.
One: an exchange will never ask you for your password, verification code, private key or seed phrase. Anyone asking, for any reason (“support needs to verify you”, “to help unfreeze the account”, “system upgrade”), is running a scam. No exceptions.
Two: never install remote assistance software at anyone's direction. “Let me just do it for you” is the standard opening of social engineering. Screen sharing is equally dangerous — your codes are visible in real time.
Why it matters
The defining difference between crypto and a bank account is irreversibility. A mistaken bank transfer can sometimes be recalled; a confirmed on-chain transfer cannot be undone by anyone. That forces a prevention-first posture, because there is essentially no room to fix things afterwards.
The four settings above put four independent doors between an attacker and your assets. Breaking the password is only the first; without the authenticator they can't pass the second; the anti-phishing code makes the initial deception harder to stage; and the allowlist disables the final step of actually moving the coins.
Where it goes wrong
- Authenticator codes are always wrong. TOTP depends on device time. Turn on automatic date and time on the phone, or use the time-correction option inside Authy or Google Authenticator.
- New phone, no entries in the authenticator. If you wrote down the backup key, just re-add it on the new device. If you didn't, you're in the platform's account recovery process — documents, face verification, waiting, and restricted functionality throughout.
- The allowlisted address won't activate. That's the designed cooling-off period, not a fault. Plan for it; don't add an address for the first time on the day you urgently need to withdraw.
Step 3: identity verification
What to do
Verification generally needs: a valid identity document (passport, national ID or driving licence, depending on the country you selected), photographs of it (both sides; a passport usually just the data page), and a liveness check (turn your head, blink, on prompt). Some cases also require proof of address such as a utility bill or bank statement from the last three months.
A few details raise first-pass success rates noticeably: shoot in natural light and avoid flash reflections; lay the document flat on a dark surface with all four corners inside the frame; don't crop, don't filter, don't photograph a scan or a screen; and make sure the document is still in date.
Why it matters
This isn't the platform coveting your privacy — it's a hard requirement of anti-money-laundering and know-your-customer regulation. Unverified accounts usually face limits on deposits, trading and withdrawals, and some functions simply won't open.
More practically: the information you submit has to match who you actually are. Using someone else's documents, or entering a nationality that doesn't match them, creates problems at the first large withdrawal or risk review — at which point the account can be restricted and you can't prove the assets are yours. Those cases rarely end well.
Where it goes wrong
A rejection doesn't necessarily say anything about you; more often the material itself wasn't captured well. Typical causes: the photo is blurred or the glare hides key fields; corners were cropped out; the liveness check was done in poor light or with glasses or a mask on; the name spelling doesn't exactly match the document (middle names and hyphens especially); the document has expired.
After a rejection, don't repeatedly resubmit the same material — each submission puts you back in the queue and makes it slower. Zoom the photo to 100% on a computer and look at three fields: document number, name, expiry date. If you have to squint at any of them, the system can't read them either.
Step 4: getting money in
Three common routes, with quite different costs and use cases.
| Route | How it works | Cost profile | Who it suits |
|---|---|---|---|
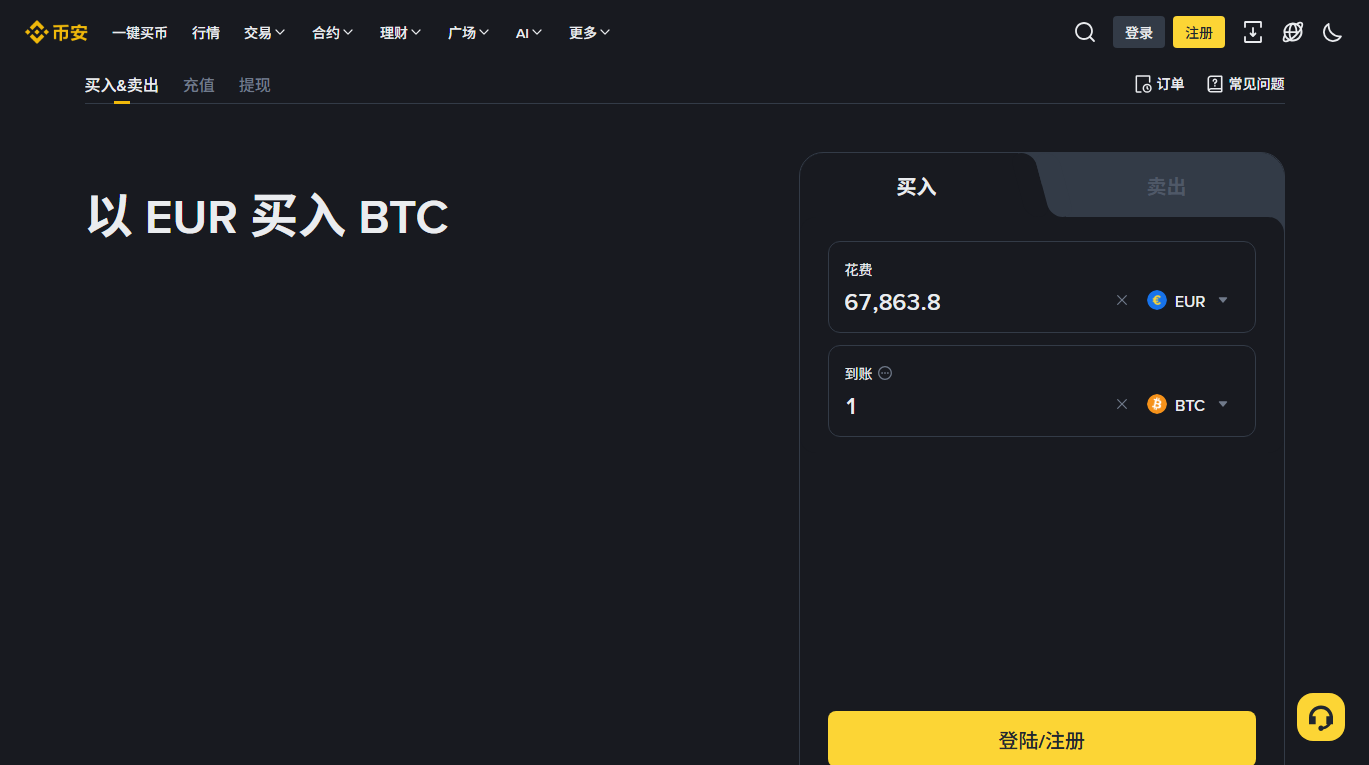
| On-chain deposit | Send crypto from another exchange or your own wallet to the deposit address the platform gives you | The platform usually charges nothing to receive, but the sending side charges a withdrawal fee and the network charges its own | People who already hold crypto |
| P2P trading | The platform matches you with another user for a fiat trade and holds the crypto in escrow as a guarantee | Usually no matching fee; the cost shows up in the spread | People buying with fiat for the first time |
| Card / instant buy | Purchase directly with a bank card or third-party payment channel | Easiest, but typically the highest all-in cost — spread plus channel fees | People testing a small amount who don't mind the cost |
One: never leave the platform. If the counterparty suggests “let's just transfer directly and save the fee”, refuse. The platform's escrow is your only protection; once you're outside it, paying and not receiving leaves you with no recourse at all.
Two: as a seller, confirm receipt yourself before releasing. Log into your bank and verify the money actually arrived. Never accept a screenshot of a transfer as proof — forging one costs nothing.
Where it goes wrong
- An on-chain deposit doesn't arrive. First, look up the transaction hash on a block explorer. If the chain shows it confirmed but the platform hasn't credited it, it usually needs more confirmations — keep waiting. If the chain doesn't know the transaction at all, the sending side never broadcast it, and the problem is at that end.
- You used the wrong network. For example sending BEP20 USDT to an ERC20 address. Of all these mistakes, this is the hardest to undo. Contact the platform's official support immediately rather than experimenting. Whether it can be recovered depends on whether the two chains' address formats are compatible and whether the platform offers a recovery service — don't assume it can be.
- The card payment is declined. Many banks simply refuse crypto-related merchants. That's not the platform's doing; another card or another route is the realistic fix.
Step 5: your first spot trade
What to do
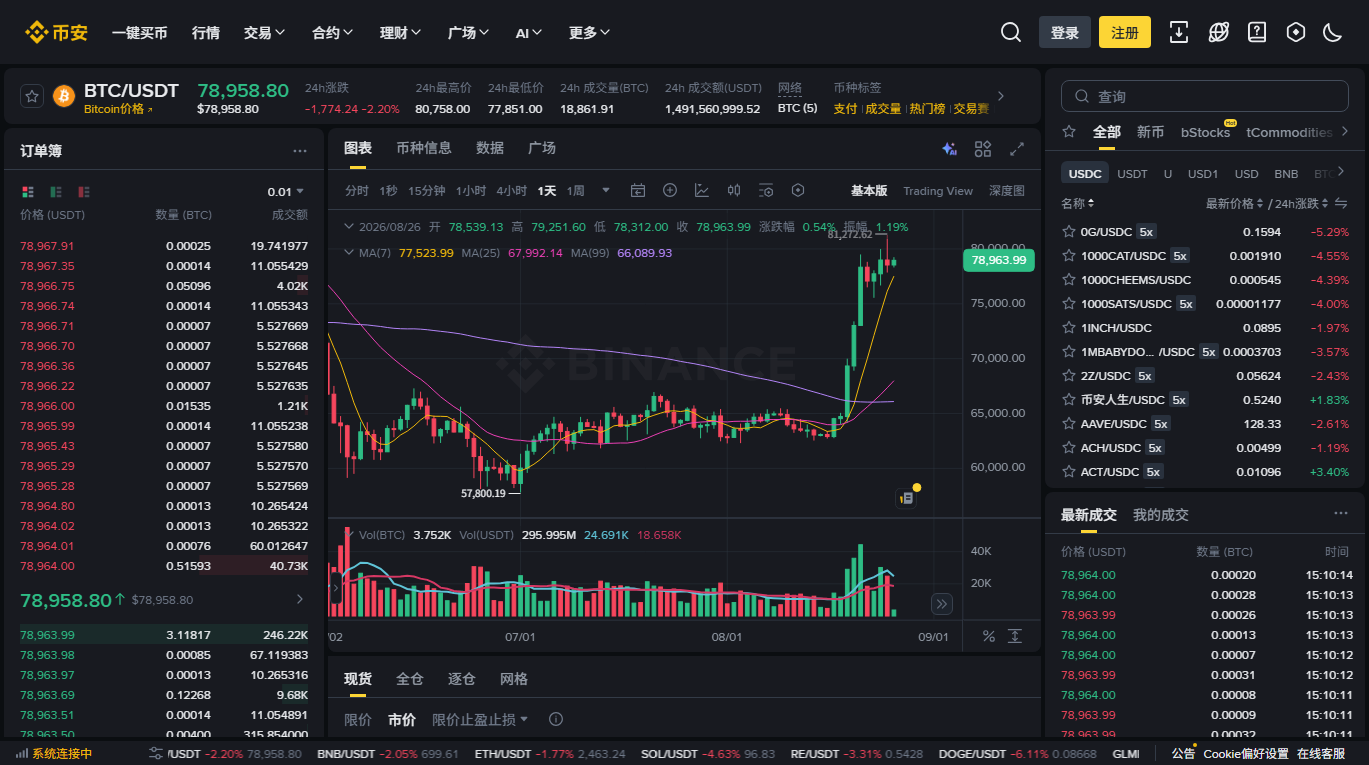
Open the spot trading page and you'll see three blocks: the order book on the left (bids and asks with sizes), a chart in the middle, and the order form below. For a first trade, only the order form matters.
-
Pick the pair
BTC/USDTmeans “buy and sell BTC using USDT”. What's before the slash is the asset you're trading; what's after is what you're pricing it in. You need USDT in the account to buy BTC. -
Choose the order type — start with a limit order
A market order executes immediately at the best available price: fast, but you don't know the final price, and on a thin pair slippage can take a real bite. A limit order executes only at the price you name: it may wait, it may never fill, but the price is entirely under your control.
Use a limit order for the first one. Not mainly because it's cheaper, but because it forces you to decide, before clicking, what price you're actually willing to pay.
-
Enter the size, then check it again
The form usually offers 25% / 50% / 75% / 100% shortcuts. Don't press 100% on your first trade. Use an amount so small you genuinely don't care, walk the whole path, confirm every screen shows what you expect, and only then consider size.
Before confirming, read the price, the quantity and the estimated total out loud. One extra zero makes the order ten times larger.
-
Read the result
After it fills, order history shows the execution price, quantity and fee. Deliberately look at the fee column — that one glance teaches you more about trading costs than ten articles.
Why limit orders usually cost less
Exchanges often price makers (your order rests in the book and adds liquidity) differently from takers (your order immediately consumes someone else's and removes liquidity). The gap for ordinary users is typically small, and it widens at higher tiers.
For a beginner, then, what a limit order saves is mostly not the fee — it's slippage. A market order in a thin moment can fill far away from what you expected, and that loss is often much larger than the commission. The precise meaning of slippage, spread and depth is in the glossary, and you can measure the effect on a live book with the depth and impact estimator.
Where it goes wrong
- “Order value too small”. Every pair has a minimum notional (commonly a few dollars to low double digits). Increase the amount or pick a pair with a lower threshold.
- The limit order sits there unfilled. The market simply hasn't reached your price. Wait, or cancel and reprice. An unfilled order costs nothing.
- “It filled at a different price than I saw.” If you used a market order, that's ordinary slippage — the book changed between your click and the match.
Step 6: taking it out (or not)
Most guides stop at “you bought something”. For a beginner, walking the withdrawal path once matters more than buying more. The reason: you want to practise choosing a network, entering an address and waiting for confirmations while the amount is trivial — not the first time you're moving something significant.
What to do
-
Find out which network the receiving side supports
The same asset (USDT, say) exists on multiple chains: Ethereum (ERC20), BNB Smart Chain (BEP20), Tron (TRC20), Solana and others. The sending and receiving sides must use the same one. Go to the receiving end — the other exchange or your wallet — read which network its deposit address belongs to, then come back and select that network on the withdrawal page.
-
Copy and paste the address; never type it
After pasting, check the whole string character by character rather than only the first and last few. A class of malware watches the clipboard and swaps the address at the moment you paste, and the substituted address may be chosen so that its first and last characters look similar — checking only the ends would miss it.
-
Send a small test first
The first time you send to any new address, send a trivial amount. Confirm it arrives, then send the rest. The fee on that test transfer is the cheapest insurance available to you.
-
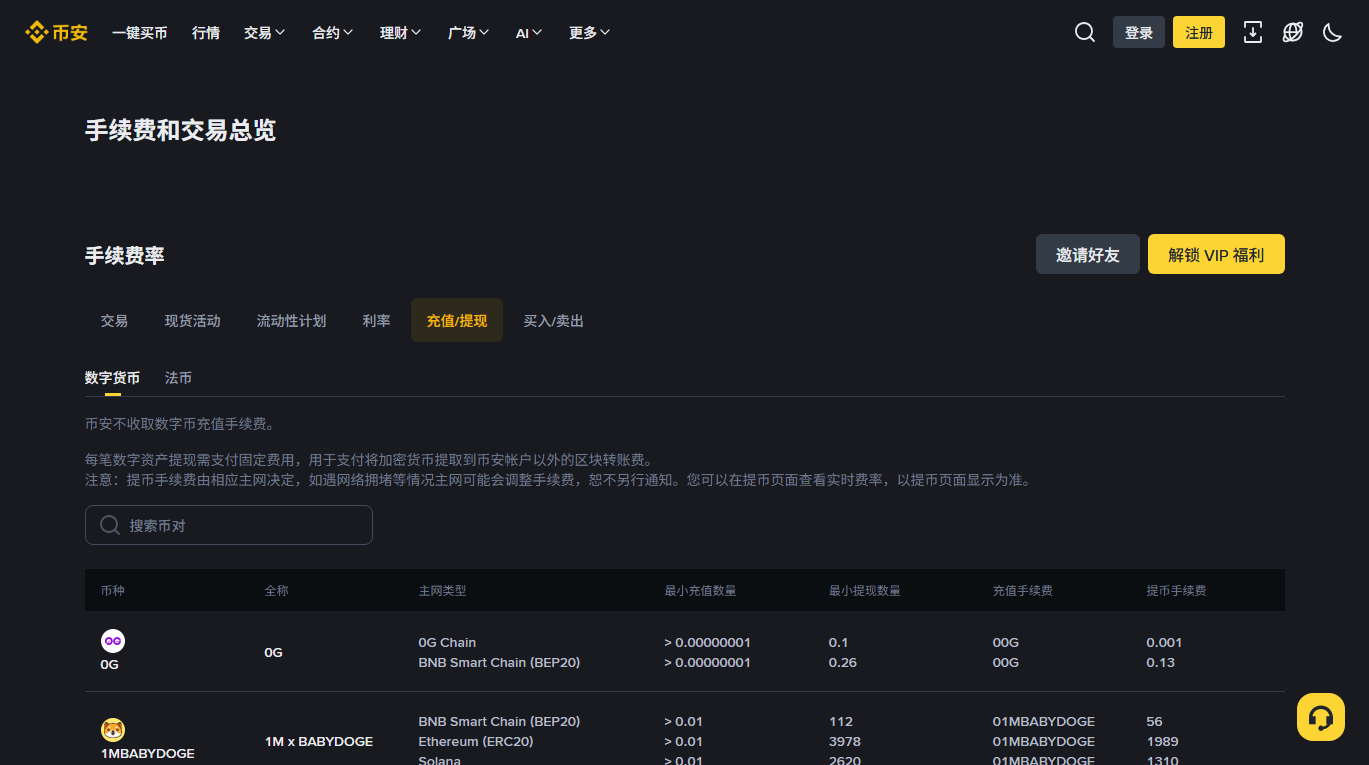
Check the fee and expected arrival time
The platform sets the withdrawal fee separately for each network you can choose, and the same asset can cost far more on one chain than another. Arrival time depends on that chain's block rate and the platform's required confirmations.
Leaving assets on an exchange long-term means what you hold is an entry in the platform's ledger, not the on-chain asset itself. Platforms can suspend withdrawals because of technical failures, regulatory action or business problems. That's what the old line means: not your keys, not your coins.
This isn't an argument that everything must be moved to self-custody — self-custody has its own risks, and a lost seed phrase is just as irreversible with no support desk to call. It's an argument that you should know which risk you're carrying and choose it deliberately rather than by never having thought about it.
The three mistakes people make right after the mechanics click
This section is specific to this site, and it's the real reason this article exists. The six steps above appear in any guide. The three below almost never do, because they target people who have just acquired explanatory power — which is exactly where our readers are.
Mistake one: mistaking “I understand” for “I can anticipate”
Once the four layers land, the market feels legible for the first time: that one was a liquidation cascade, this one was macro moving in step, that other one was a structural event. The feeling is real progress. But it slides very easily into a false conclusion — if I can explain why it moved, surely I can judge where it moves next.
There is no bridge between those. Explanation attributes causes with the outcome already known and the information complete; prediction judges an unknown outcome, and every piece of public information you're using is available to everyone else too. Improvement in the first does not automatically transfer to the second. That boundary is the point of why “sentiment improved” explains nothing.
Mistake two: acting on the headline
You now know that structural events move prices, so when a significant story appears your first instinct is to do something. The problem: the moment you see a piece of news is usually not the moment it first entered the price.
Information passes through several stages between happening and reaching you, and markets typically begin pricing an expectation well before formal confirmation. That's why “good news lands and the price falls” happens so often — not market irrationality, but a story that was absorbed before it landed, with the confirmation becoming the moment some participants take the other side. Full mechanism in why the price already moved before you saw the news.
Mistake three: panic selling into drops, adding into rallies
The oldest mistake there is, but people who understand mechanisms have a special way of committing it: using freshly learned frameworks to supply a technical justification for an emotional decision. Price falls, you open the liquidation data, see heavy long liquidations, conclude “the leverage hasn't cleared, more downside to come” — and sell. That chain sounds professional, but every link in it is information available after the fact, and only the final “more downside to come” is an unsupported extrapolation.
The matching practice is to hand the decision to rules set in advance rather than to explanations produced in the moment: decide the amount before you start, and make it an amount whose total loss doesn't change your life. That was said at the top of this article, and it's repeated here because it is the only piece of guidance that holds in every situation.
This site doesn't know what suits you and doesn't assess your circumstances. “Understanding the mechanics” is all we offer; it reduces confusion, not risk. If you find yourself checking the price constantly and each check moves your mood, that has nothing to do with knowledge — the position is simply too large relative to what you can carry.
Common questions
Can I trade without completing identity verification?
Unverified accounts usually face meaningful limits on deposits, trading and withdrawals, and some functions won't open at all. The exact limits depend on current platform policy and your account's region — go by what your account page tells you.
I forgot to enter a referral code. Can I add it afterwards?
Generally no. The referral relationship is normally fixed when the account is created and can't be attached later. If it matters to you, do it on the signup form.
How much should my first trade be?
This site doesn't give amounts. What can be said about process: the first trade should be small enough that losing all of it wouldn't affect your mood at all, because its purpose is to walk the path — signup, deposit, order, withdrawal — and verify each screen behaves as expected. Its purpose is not to make money.
Why are withdrawal fees sometimes so high?
The platform sets a separate withdrawal fee for each network, so the same asset does not cost the same on every chain, and it adjusts that figure as the network's own costs move. Ethereum mainnet can be markedly more expensive when its costs are high, while the same asset on another network is often far cheaper. Check the fee page's current number for that network before choosing one.
My account has been restricted or frozen. What now?
Only the platform's official support can address it, usually requiring identity documents and proof of the source of funds. This site is not an exchange's employee or agent and cannot unfreeze anything or speed anything up. Anyone claiming they can “handle it internally” for an up-front payment is running a scam.
Do I need my own wallet?
It depends on your holding period and size. For small, short-term, frequently traded amounts, an exchange is more convenient; for larger long-term holdings, self-custody removes platform risk but makes you solely responsible for a seed phrase that nobody can recover if it's lost. Both carry a cost, and the trade-off is yours to make.
Ready to open an account
The link below is a promotional link, written out in full on the button with no redirect in between. An account opened through it is attached to MovePith's referral relationship, and Binance returns a share of the trading fees you generate to this site. That share comes out of the fee Binance already charges; it does not normally add a cost for you or raise your fee tier — go by what the official page shows at the time. Using it or not changes nothing about what you can read here. Full details in Disclosure and risk.
Open Binance's official sign-up page (accounts.binance.com, referral code BN0112)
Before you click, check that the address bar reads accounts.binance.com — treat any near-miss spelling as a phishing site. Confirm for yourself that your jurisdiction permits you to use the platform. Crypto prices are highly volatile and nothing here is investment advice.